 Black Rock City 2010 Satellite Image
For those not familiar with Burning Man, the week-long festival is held on a dry lake bed in Nevada's Black Rock Desert. The ephemeral Black Rock City, temporary home to more than 50,000 people, is shaped like a giant 'C' and features a network of streets arranged in a polar grid. While navigation is usually simple -- provided the navigator is sufficiently sober to read and comprehend street signs -- blowing dust can create frequent white-out conditions with near-zero visibility, and all of the street signs are traditionally swiped as souvenirs toward the end of the event.
While the fine folks at Burning Man Earth do an excellent job mapping the city each year and can provide maps for hand-held GPS receivers and smart phones, I decided that I wanted to build something more unique and specialized for navigating at my first Burn.
In the customary manner of many Burning Man projects, this started out as a grand concept involving a lot of blinking lights and machined brass, and ended as something considerably less grand and more rushed, but surprisingly functional nonetheless.
My initial idea for a ‘golden compass’ style device turned out to be a bit beyond my machining skills – or at least my time-management skills. Instead, I chose a 4” black sewer pipe end cap as the housing for the navigator. I did apply some green metallic star stickers, though, which I think really added something.

The size meant it wouldn’t be suitable for carrying in a pocket or on my wrist, but it would fit on my bicycle handlebars just fine. I even found a ball and socket swivel with a quick-release that worked beautifully for this purpose. I’m still not certain why I had a box of swivel mounts in my shop – most likely Electronic Goldmine had a sale on them a few years ago – but sometimes my pack rat nature pays off.
The next challenge was the display. I considered a cross-needle meter, but they're hard to find, and would be hard to see in the dark. I also thought about a persistence-of-vision display with a rotating LED array, but not having dealt with slip rings before, I wasn't sure I could get rotating contacts to work right on the first try. I looked at a few other options and decided on a linear array of LEDs rotated by an R/C servo, underneath an engraved acrylic map of the city. The servo would move the array into the proper position and a single LED would light to indicate the user's location.
I'd never used servos before and I'm not great with mechanical design, so I was a little worried about that part. I had a few servos kicking around in the shop, so I plugged one in and started experimenting. They turned out to be easier than I expected to work with, but I quickly discovered a flaw in my plan: the servos only had about 170 degrees of travel, and I needed to cover at least 240 degrees on the semicircular city map.
I decided against trying to modify a servo (or rather, I broke one in the attempt and decided it wasn't worth the trouble) and didn't want to use an expensive sail winch type, so instead I made the pointer board with two LED arrays at a 90-degree angle. By selecting one array or the other, I could move the pointer LED across 280 degrees.
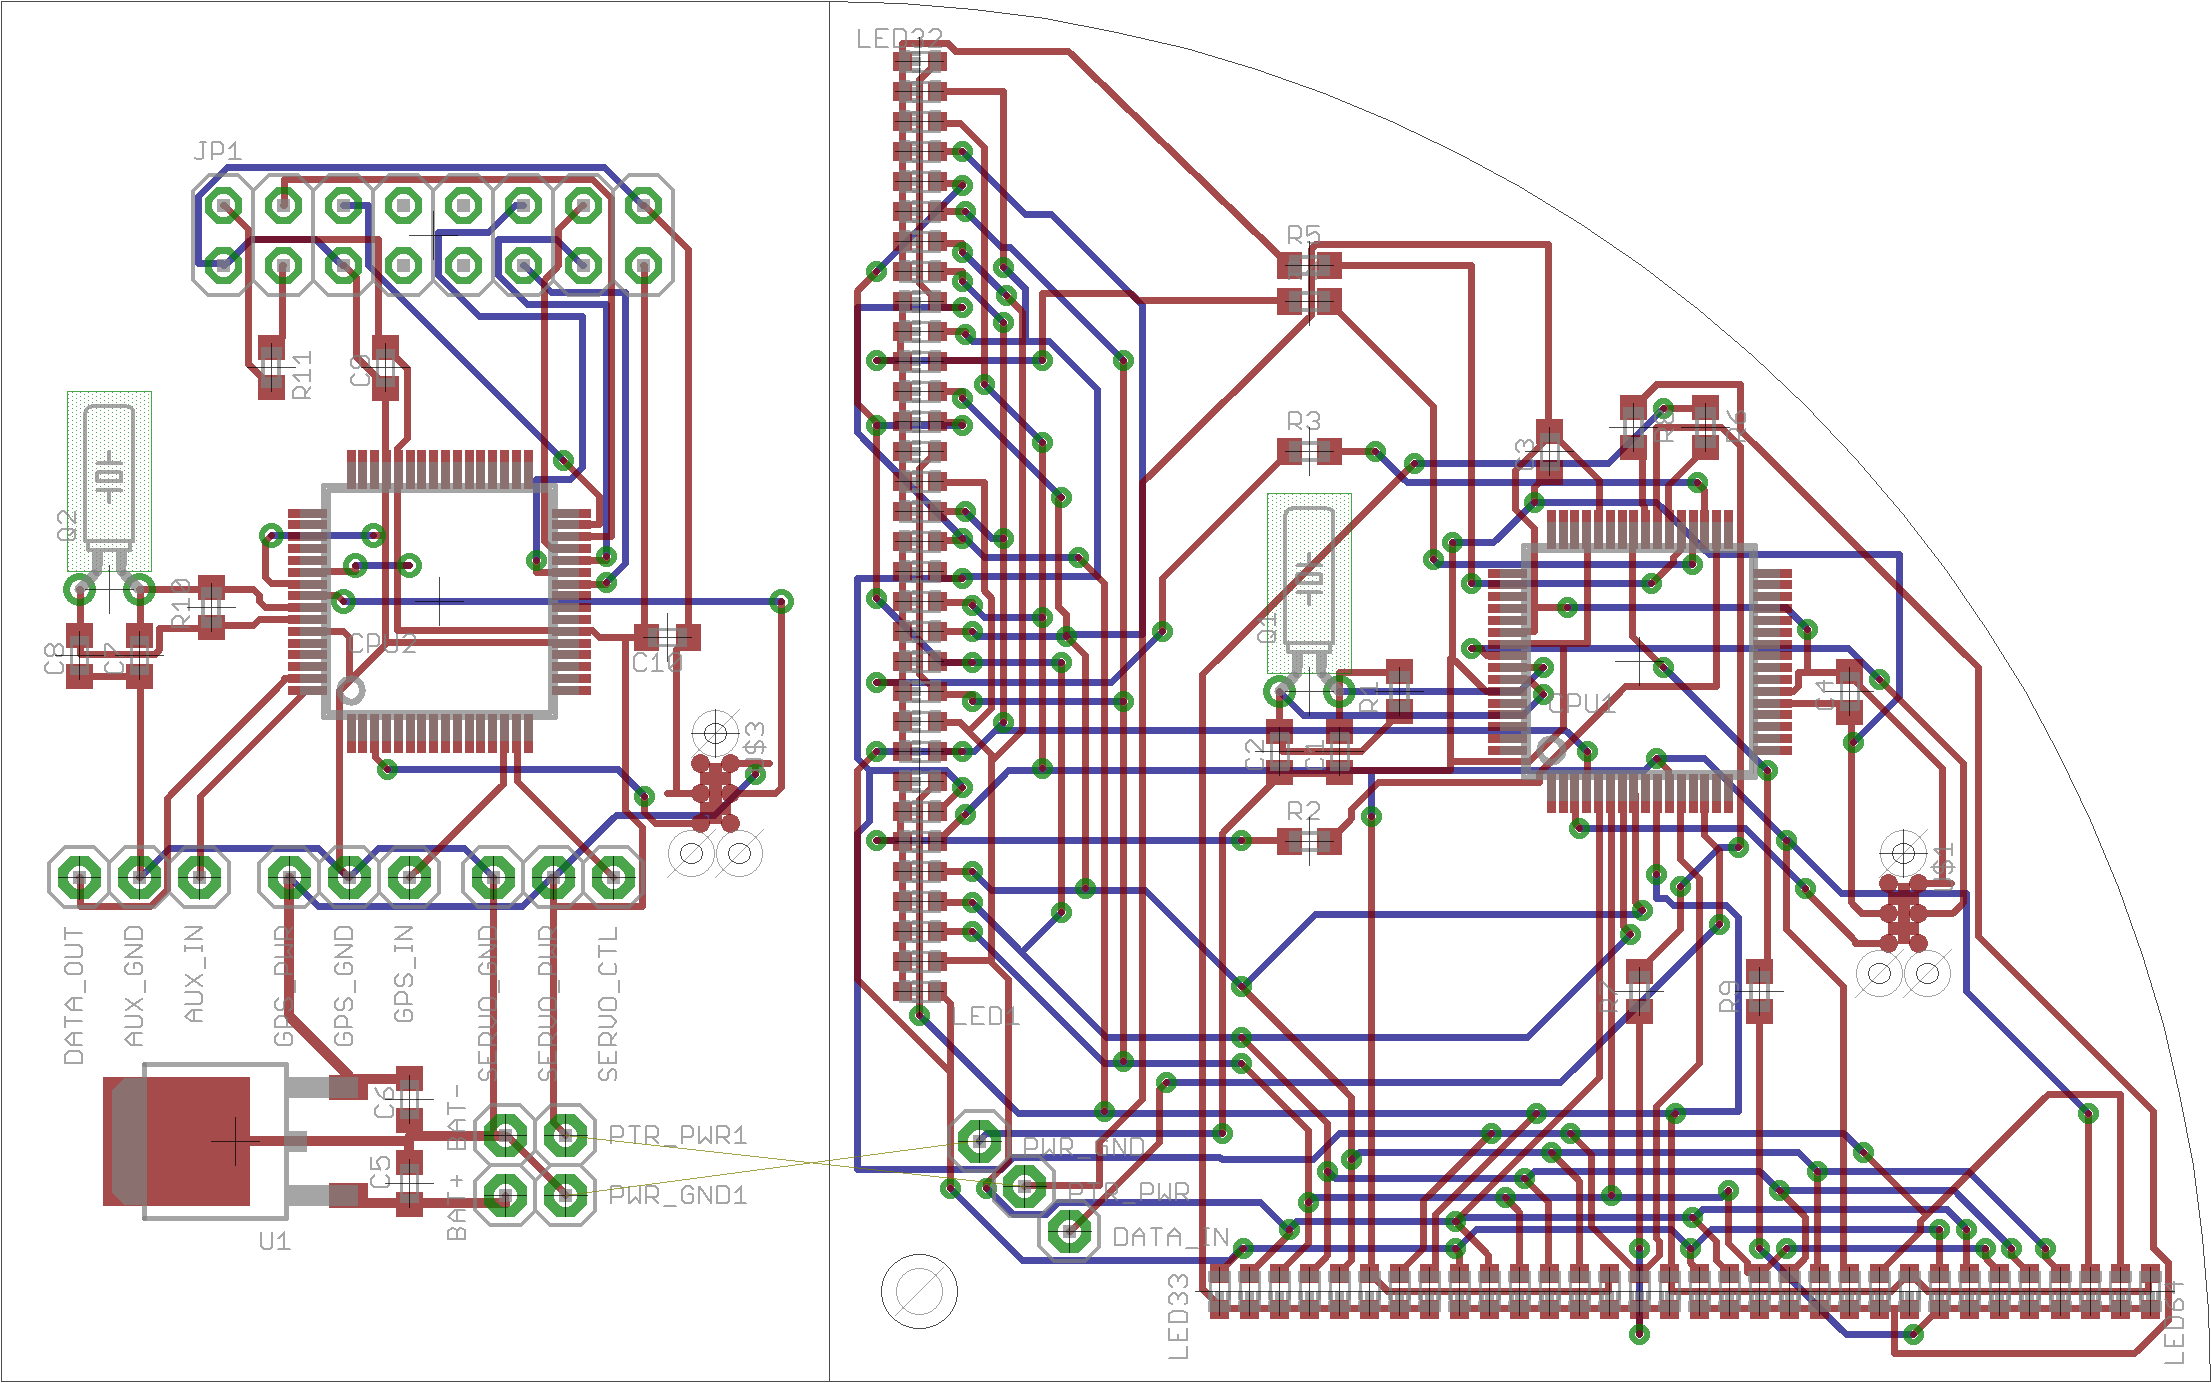
Electrically, I kept the design about as simple as I could. The main board has a Freescale MC9S08AW32 microcontroller, voltage regulator, and hookups for the pointer board, GPS receiver, and servo. The pointer board has another MC9S08AW32 and two arrays of 32 super-bright green LEDs. The MCU on the pointer board simply turns on and off LEDs in response to serial commands from the main MCU. I'd considered a few designs with specialized demultiplexer/driver parts, but realized there wasn't much point when I had a tray full of suitable MCUs on hand (costing somewhere under $4 each), and the slave software would only take a few minutes to write.
 Disassembled
The best map I could find of the city was in PDF format, so I imported it into Photoshop, cleaned it up a bit, and exported it to the Dr Engrave program that came with my MDX-20 milling machine. Of the fluorescent acrylic sheets I had on hand, orange and green seemed to work best. I chose green to match the LEDs and my bicycle. Getting good engraving results took some experimentation with tools and settings, but I only wasted a few 6"x6" acrylic sheets before I got it right. For the depth I needed, a 1/32" end mill did a better job than a 60-degree engraving bit, and I found that engraving the back side worked better than engraving the front.

I wasn't quite sure how I was going to mount the servo, so I started by cutting a disc from 1/16" black G-10 Garolite - basically printed circuit board material without the copper. I did this part early on and made a cutout for the small servo I was using, but broke that servo and had to use a larger one that wouldn't fit the hole. I'd intended to use standoffs to mount the disc to another disc, or to the bottom of the housing, but somewhere along the line I discovered that it fit snugly at the bottom of the end cap and that I could hot-glue the larger servo directly to it. This turned out to be good enough, and actually made it easier to align everything later on.
 Note the complete lack of use of the mounting holes
Some final tweaking was done in the RV on the drive to Nevada. Of particular concern was the need to get the servo and map disc aligned. To this end I wrote a self-test sequence that would rotate the pointer to the leftmost road, wait a couple of seconds, and then rotate to the rightmost road, all while cycling through all of the LEDs on both arrays. This made for a nice start-up demo and let me easily adjust the disc to match the servo.
 Finished display in operation
Calibration of the map requires three elements: the map center coordinates, the compass angle of the first street, and the scale of the map. The first I got from Haggis at Burning Man Earth and was well-known in advance since the entire city is laid out around a marker spike driven at that point. The second wasn’t explicitly stated on the map I had, but I made an educated guess. The last was the least certain, but again I made a guess and got it pretty close. I refined my guesses using readings from a handheld GPS receiver once I was on the playa.
The indicated position was still off a bit in some parts of the city and I never had the time to track down the source of the error (perhaps some non-linearity in the servo’s response?) but everywhere it was within half a block, good enough for basic navigation. If I’d had time to add the planned LCD character display it would have been easier to debug.
Responses to the gadget ranged from the jaded but polite (“Is that a playa compass? Cool.”) to the… ah, ecstatic (“Ohmygod that is so &%@#ing AWESOME! YES! Can I take a picture? I LOVE it!”)
 Ooh... shiny!
The source code is full of unfinished and unused junk and the board layouts were quick and dirty, but both are available here (C source for CodeWarrior, schematic and board layout in Eagle PCB). I've also got several extra sets of boards on hand - I don't want money for them, but I'll consider on-playa trades for food, shiny objects, or what have you at Burning Man this year!
Parts sources:
Digi-Key for processors, LEDs, and such
Strike Models for servos
Delvie's Plastics for fluorescent cast acrylic
McMaster-Carr for Garolite sheet, screws, and end mills
Argent Data Systems (i.e., from my own warehouse) for the GPS receiver
Orchard Supply Hardware for the ABS sewer pipe cap
Eye photo courtesy of Flickr user Monkey Boson (CC-attribution license)

6 comments:
This is one of the most inspiring things I've ever seen online. I want to be able to do THAT when I grow up (and the fact that I'm 25 and my degree is in music doesn't reflect too positively on that aspiration.)
Thank you for sharing! Might I ask, what is your educational background? How did you get into this Davinci-esque occupation? How many decades did it take?:)
WTH? This is f***ing awesome!
Most impressive. Would not expect less from you Scott.
-Ed Lizard N3GXH
that's just awesome. awesome.
just a quick shout out if people want street maps for Black Rock City that you can load on a Garmin GPS, see http://www.7hertz.com
This is a beautiful thing. I'm in awe. Are you doing the in-eye mount shown in the photo for 2011? Hope to see that!! - Kikidelosfeliz
Post a Comment